Preparing your tracks for mastering is crucial to achieving a professional, polished sound. In this guide, we cover the essential steps to ensure your music is ready for the mastering process, including tips on keeping your mix clean, exporting in the right format, organizing your files, and providing a reference track. Proper preparation not only enhances the final product but also streamlines the workflow with your mastering engineer. Follow these best practices to give your tracks the best chance to shine.
The Music Producers Guild (MPG) in partnership with the European Broadcast Union (EBU) have now standardized a metadata field for the International Standard Recording Code (ISRC) in wav files! This issue has been a long time overdue, but now finally gained enough traction to make it into a standard. The ISRC can now be embedded in wav files inside the core metadata. This means it will follow the file where ever it goes.
This question has come up with relative frequency, so I'm going to write the step-by-step directions to let you get your reference CD into your computer as .wav files or mp3 files.
These step by step directions are for converting a disc to .wav files, but the steps will be similar for converting to MP3 too.
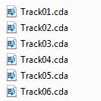
Often a source of confusion is the .cda file. On a windows computer, when you insert a RedBook Audio CD, the tracks show up as .cda files. One might assume that these are the audio files on the disc because they are the only items that show up in the explorer window. . . that would be wrong. The .cda files are merely placeholders pointing to a place on the CD that the song starts. Think of them as what windows calls a 'shortcut'.
This shouldn't even be an issue, but it has become one. . . Thanks Apple. . .


